Tuesday, July 17, 2012

What's Up, Ombre?


It's about time we took a minute to discuss the ombre.  What's ombre, you ask???  It's the style for hair that came back about a year ago and we can't seem to shake it.  I like to call it, more simply, the hair color fade...or the, "I'm letting my roots grow in" look.  I have to be honest when I say I was not a huge fan of the look at first - but I do think it's growing on me more and more.  Probably when I start to love it, it will be out of style...but I will say it's still pretty hot.


More specifically, the ombre hairstyle is lightening the tips of your hair gradually to blend with the darker top.  Sometimes, this just happens naturally from sun exposure, which is why I think this look was big for hippies back in the 70's - you know, being one with nature and all that jazz.  Fortunately, or unfortunately, for us (however you want to see it) that, natural, wavy, braids, feathers, and all things peace and love are trending yet again.  Hence, we see the modern day ombre.  It's young and fun and I think it's time to get on board.  Been contemplating it for awhile?  Come in and give it a whirl!


Yes, it is hard to pull off if you are a natural blondie, but you can still give it a whirl by lightening up the ends of your hair.  Or, if you're really feeling daring, the ombre trend has (as of late) taken quite an interesting spin.  The newest craze in different colored hair tips?  RAINBOW OMBRE!  Lauren Conrad sent this intense hair style spiraling into popularity by showing young girls how to do it on their own.   I know, I know, this is not for everyone.  I think you really do have to be YOUNG and FUN to pull off dying your tips shades of turquoise, purples, and hot pinks, but, hey, maybe you will become young and fun just by default for giving it a go.  As much of a statement it makes, we think the overall look is pretty cool.  It works by bleaching your tips and then soaking them in different color dyes.  Interested in giving it a shot?  Come in and we'll help you get the look!  Young girls...double check with your parental units first - we don't want anyone coming in furiously ranting and raving - and we want you to enjoy your summer without being grounded!


Thursday, June 28, 2012

COLOR WARS: Blondes vs. Brunettes ROUND 1


Ah, yes, the age old question: which do you prefer?  Blondes or brunettes?  The battle has been going on for decades...  so what do you think?  Do blondes really have more fun?  Are brunettes really smarter?  Tell us what you think!

The following is a video of the Sunsilk Guys taking to the streets of New York asking women what they think.

Here they are asking brunettes if they are better than blondes...


...and here is what they got when they asked blondes if they are better than brunettes...


...here the brunettes explain why...


...and here the blondes explain why...


I don't know if either side raised any great points...but nevertheless, the color war continues!  
Which side are YOU on?????
  

Wednesday, June 6, 2012

Royal Beauty: Keep It Simple Stupid!


It's hard to not look at the newest member of the Royal Family - Kate Middleton - and keep yourself from falling head-over-heels in love with her style.  Everything about her irresistibly likeable-look draws immediate attention from awed spectators all around the world.  It's no wonder why we want to break down her beauty style and make it doable for us mere mortals!


Don't shy away from the fact that she's married to "prince charming" and found her happily every after - surrounded by personal stylists, hair designers, and makeup artists.  Despite all of that, her style is really quite down-to-earth.  It's NOT impossible for you to get her look without getting the "royal treatment" on a day to day basis.  We think that's what makes Kate's style so attractive to us: it's that simple, natural beauty.  Anyone, anywhere is capable of pulling that off.

Kate has a go-to hair and makeup style for both the casual, everyday wear, and for more formal events.  The great thing about sticking to what you know works, is that you can dress it up or down with your clothes.   So whether you are going to a wedding, birthday party, or just out to lunch, you can pull off the loose curls that Kate Middleton loves to rock.  It's simple, easy, and oh-so-beautiful.

There are two ways to master the voluptuous long curls.  Here's how you get the look:  With freshly washed and still wet hair, take it one section at a time.  To make it easier on yourself, clip up portions of your hair on the top of your head to keep them out of the way.  Using a large round brush, wrap the ends of your hair around the brush as you blow it dry.  To get a little more volume and movement in your hair, alternate the way you curl the ends of your hair - with some pieces flipping in, and some pieces flipping out.  When you get to the pieces at the top of your head, blow them dry in the opposite direction that they lay on your head.  This gives a little lift at the root.  For the pieces around your face, curl your hair (with the round brush as you dry it) away from your face to give it that sweeping look.


If you're looking to get a little extra curl after your hair has been blown dry, you can touch up the ends  with a large (1 1/2 inch barrel) curling iron, roll up the bottom 2 inches of your hair and hold for about 10 seconds per section.   From there, give the ends a good spray with a light hold hairspray (one that still gives your hair a soft look and feel).  I personally recommend Moroccan Oil Hairspray which keeps the hold but doesn't make your hair crusty and hard.

The good news is that once you've mastered the basic Kate Middleton hairstyle, you can get versatile with it as well.  Pull it back into a cute, casual pony, or use a couple bobby pins and gather a section at the top of  head with a casual half up - half down look.  If you feel like this would be too difficult for you, come into the salon so we can blow out your hair and show you how it's done in person!
 But we love that IT'S JUST THAT SIMPLE! The fact that Kate Middleton's style can be mimicked so easily is what makes her that much more likable.  And it's not just the hair that she does so simply.  Her makeup is always very natural looking - whether she's going to a park or a royal ball.  Again - what's not to love about this girl?!?  To get that natural, pretty, Kate Middleton - fresh face - keep it routine.  Guys aren't going to want you looking too done up with dramatic makeup anyways (they will just think you have a lot of stuff on your face).


So here it is.  This is such an easy - everyday makeup routine we all can master.  Stick with a light neutral color as your all over eyeshadow (from your lid to your eyebrow).  This should be a light - almost sheer - base coat for your eyes.  Directly on the lid she has a darker earthy hue (stick with a brown, grey, or even purple).  Line the entire eye (top and bottom) along the rim with a black eyeliner.  If you have lighter hair and don't want to do such a dramatic line, you can stick with brown instead.  Fill in the brow with an eyebrow pencil to make it look nice and full.  Match your blush and your lip gloss in a rosy pink shade to give it that girly touch.  Throw on some mascara and you've got the look!  No need to get crazy with it... this is something that really works for all occasions.  Like I said: keep it simple stupid!

Erin at the salon can help you pick out some natural colors to help you get a great every day - every occasion Kate Middleton look.  And why wouldn't you want that?  Believe it or not, we can all pull off that Kate kind of gorgeous (without it being a royal pain in our you - know - whats).  Simple, classic beauty. BOOM.

Wednesday, May 16, 2012

Lighten Up


“Stand on the highest pavement of the stair—           
Lean on a garden urn—           
Weave, weave the sunlight in your hair—           
Clasp your flowers to you with a pained surprise—           
Fling them to the ground and turn                
With a fugitive resentment in your eyes:           
But weave, weave the sunlight in your hair.”
            -T.S. Elliot La Figlia Che Piange

I cannot exactly tell you what this quote by T.S. Elliot is actually about, I cannot tell you that I know how to pronounce the title of this poem, but I can tell you I’m liking the idea he is trying to get across:  WEAVE, WEAVE THE SUNLIGHT IN YOUR HAIR!  Finally the sun is out, hot, and (fingers crossed) we think it’s here to stay! It's about that time to throw in a couple highlights in your hair!
There’s something about the look of having the sunlight in you hair that is just, so…"Southern California Summertime Chic."  Those golden rays of sunshine are looking for some highlights to catch in you hair to give it that gorgeous summer glow.  So let’s lighten up!


Of course, the degree of how light you go depends entirely on the color of your hair, but just because you have dark hair doesn't mean you need to shy away at the thought of highlights!   The truth is, if you’re outside in this beautiful weather, the sun is going to begin to lighten your hair naturally – so don’t fight it!  In fact, embrace it!  Sun-kissed hair is a good look on everyone!  We’re not talking about streaky, skunk-like blonde highlights on your head, we’re talking about a nice carmel-y warmth, just adding a hint of lightness to certain parts of your hair, giving it dimension and the constant “sun is shining” look. Here are some examples of what I’m talking about:


From there, the spectrum of lightness continues…depending on how blonde you want to be for these upcoming summer months. 


Are you loving some of these colors?  Pick out the color highlight that matches with your hair color now, bring the pic into the salon, and we’ll match it!  All that time you are spending out in the sun (with sunscreen we hope), it will continue to brighten those highlights – giving you that consistent, coveted summer glow.  So let’s do it!  Let Felix Design Studio weave, weave the sunlight in your hair!

Wednesday, May 2, 2012

More BANG For Your Buck


Been thinking about switching up your hair routine lately?  This blog goes out to all of you ladies who stick to what you know.  The same trim and tint every time you go in to get your hair done.  Maybe you even go CRAZY every once and awhile and take an extra inch off of your trim (radical!), but let’s face it, sometimes you’re just ready to do something DIFFERENT!  Highlights?  Layers?  There are a ton of options to throw a curve ball on your look, but there is an easy fix to doing something noticeably different without getting too dramatic (or too permanent): BANGS! 

 
Hold on now, before you roll your eyes and say to yourself, “bangs are always a mistake,” let me give you a convincing opposing argument.  Bangs are really kinda hot right now.  They are a great way to change up your look and charge up the sexy factor.  Shows like “The New Girl” with America’s newest sweetheart Zooey Deschanel are bringing bangs back into the spotlight.  And let’s face it, guys love it!  


The great thing about bangs is that you have options.  When the same old - same old starts to get drab and boring, bangs bring in a whole new alter ego to your look.   If you’re scared to do the serious, straight across the face look, you can always try the less-dramatic-but-just-as-sexy side swept bangs.  This kind of cut works well with both long and short hair, and the longer pieces help to shape the face. 


If you are the person who is reading this and thinking, “but it’s so annoying having bangs in my eyes all the time!”  I’ve got great news for you.  Those days where you don’t want to deal with it, or simply don’t have time to do your hair, there is always the easy escape – bobby pins.  Gather your bangs, give them a twist, and pin them back.  EASY AS 1-2-3.  And you're off with your day!


Still afraid of bangs?  Check out these before and after shots with bangs and tell me they don’t look pretty smokin’ with the new look. 


Trust our team to do the same for you! Come in to Felix Design Studio, and go out with a BANG!

Tuesday, April 17, 2012

Spring Into Color


Now that you have done your “spring cleaning” (cough, cough…you have done SOME spring cleaning…right???), your nails are probably looking like they need a little touching up.  And why not?  It’s time to step into Spring with style and a splash of color.  If you’re thinking of revamping your nails-and just taking a quick vacation from reality- with a relaxing manicure, lighten up: go with pastels!  Check out some of our “FELIX FAVS” for this 2012 season by OPI.

Have a Herring Problem?, Pedal Faster Suzie, Thanks a Windmillion, and Did You 'Ear About Van Gogh?

Why are we loving these four colors, you ask?  Well, first of all, the lighter colors are just girly and let’s face it, sometimes we just need to feel like a girl.  The pastel colors of spring are feminine and flirty so remember: it’s OK to bat your eyelashes while wearing these polishes. Second of all, light colors make your skin look a little darker, and while we are rounding the corner of spring (with summer coming shortly behind) it’s nice to give the appearance of the start of a tan.  Lastly, believe it or not, pastel colors have actually been scientifically proven to enhance your mood!  So slap a smile on, get girly, and maybe accessorize these colors with pretty and delicate rings (silver or white gold usually pair well with this look).  Besides, what's NOT to love?

Want to vamp up the look even more?!?!  If you’re out of the loop, we’ll fill you in on a TREND ALERT.  It’s super hot right now to have one nail painted a different color.  Sound crazy?  It is!  But it’s also really fun.  Here, Vanessa Hudgens is sporting the look we’re talking about.


DO NOT tell yourself you are not “cool” enough to pull this off!  Try something different and take a walk on the wild side. To the right is a picture of two colors we have at the salon that might be fun to try it with. 
If you’ve been debating it in your head for awhile now, STOP DEBATING, just go in, get it done, and enjoy being on the cutting edge of style!  

Wednesday, April 11, 2012

SPRING CLEANING 101


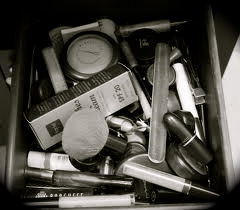
It’s that time of year!  A strange time where we notice that we need to clean out and SIMPLIFY our lives a little bit, but never really get motivated to do it.  This year, LET’S GET MOTIVATED!  We’re not talking about your whole house, let’s not get ahead of ourselves now, we’re just talking about some spring beauty cleaning.  You know what I’m talking about…that makeup drawer that has turned into an explosion of brushes, old lipstick tubes, and a coating of powder foundation over everything…time to give your beauty tools a make over!!


“OUT WITH THE OLD”

DO NOT get overwhelmed.  Turn on some music (I would recommend Adele, but that’s just me).  Now, let’s start with the basics.  Get a trash bag and start by sifting through your make-up drawer (or bag) to throw things out. 

Key things to focus on throwing out:

v    ANY makeup you haven’t used or worn in the last year (yes, it’s time to get rid of that blue eyeshadow that you thought would come back in style).

v    Notice that your lipstick tubes are all just one or two uses away from being done?  GET RID OF THEM NOW – if you love the color enough to hold onto it all this time, just buy a new one!  Same goes for blush, bronzer, and eyeshadows.  If you have held onto it because you think you still may want to scrape it out of the corners of the case – it’s time to decide: GET RID OF IT FOREVER – or – GET RID OF IT AND REPLACE IT.  Just remember we are doing this with the goal of simplifying.

v    This also goes for all of those eyeliners that you have that are shorter than your pinky finger.  Try to get it down to one or two eyeliners in your drawer AT MOST.  Any more than that and you are probably just letting bacteria build on them from sitting too long.  If you have mascara that is more than 6 months old – it’s trash.

v    Believe it or not, foundations and concealers also go bad.  If you have had some for longer than a year – they are most likely expired.  They begin to break down and can end up being not so healthy to put on your skin.  Why risk a break out? Throw it in the trash start over with a new one (remember, you only need to do this once a year).  Try to limit yourself to have one concealer (a little lighter than your skin color to cover up blemishes) and two shades of foundation (one for the winter when your skin is lighter, and one for the summer when you’re nice and tan).  Keeping it this simple helps save space in your drawer and MONEY!

v    Throw out any old makeup sponges.  No debating that.  It’s like, $2 for a bag of new ones at CVS. 

v    Makeup brushes can get the dirtiest of all.  If your brush is completely fanned out, looking like a truck ran it over a couple of times, has shortened, broken, or losing brush hairs (you know who you are) – it’s time to let go.  That’s right.  I know you loved your brushes and they have been good to you, but really, it’s not good for your skin, and it probably hurts to use on your face!  Trust me, when you replace your blush or foundation brush with a brand spankin’ new one, you will notice how soft your brush may have once been – and you will never look back. 

CLEANING

Now that you have thrown out all that is old and disgusting, it’s time to clean the things you actually are still using.

v    First, grab a wet towel and start pulling out your makeup and makeup brushes you still know you ABSOLUTELY use, and are relatively updated (again, a good rule of thumb is if you have bought it in the last 6-8 months at the longest).  Wipe these all clean of makeup that may have gotten on them and coated them over the years.  Because I use powder foundation, I have noticed a thin layer of brown powder over EVERYTHING in my drawer.  Whatever is on it, the wet towel can usually get things looking a little bit neater.  If  it is so dirty that you can’t seem to get it cleaned with a water and a towel, well, then it’s probably time to say goodbye.

v    Give your makeup brushes you decided to keep a deep cleaning treatment.  If you don’t do this regularly, it’s okay – who has time for that anyway?  But since we are cleaning, we’re going to need to do this.  Bacteria is gross, so let’s get rid of it.  Rinse off your brushes under the faucet first.  If you have brush cleaner, that's great, but if you are like most of the world and you don't, that's okay too because guess what, baby shampoo works just as well.  Get in between the brushes and wash off all of that old makeup and be sure to rinse thoroughly under the faucet again.  Then leave the brushes to dry standing with the brush side up.  EASY!  

v    Once you have pulled everything out of your drawer, grab some all purpose cleaner and give the inside of your drawer a good wipe down.  You could be surprised at how nasty the inside of a drawer can get.  It’s okay to feel like you are actually getting somewhere when you see your nice clean empty drawer – because you are!  If you keep all of your makeup in a bag, turn it inside out and throw it in the laundry!  It may come out looking dramatically different than the way it went in – in a good way!

v    Take a deep breath. 

v    Before you start putting things back in, grab a pen and a piece of paper.  Time to make a list.  What is it that you threw out that you need to replace?  New foundation brush?  Write it down.  Got rid of that nasty old pencil sharpener?  Write it down.  Need that favorite shade of lipstick you had four old tubes of?  Write it down.  As you take inventory of what you have left after the mass excavation, remember – the goal is to keep it simple.  If you got rid of really old things you have had forever, there was a reason for it.  Only replace the things you have actually used to death.  Don’t put anything on your list that strays away from the basics.

ORGANIZING & STORAGE

Finally, you are ready to start putting things away – in a NICE and ORDERLY fashion.  If you throw it all back in the drawer again – you will probably be back to square one in a matter of weeks. 

v    If your drawer is deep enough, it’s worth it to get little storage containers to separate different compartments in your makeup drawer.  You can find these almost anywhere (Target, Big Lots, Container Store).  If you don’t have them – put them on your list!

CONTAINER STORE $6.99 - $9.99
TARGET $8.99
                                
v    DO NOT put your makeup brushes back in the drawer!  The best way to store you brushes is standing upright in a cup of some sort with the brush end up.  You can get creative with how you do this to match your style or the style of your bathroom.  To the right is a fun and cute way I store my makeup brushes that my cousin showed me.  It’s important to take good care of your brushes so you don’t have to end up throwing them out again the next time you do this.
v    Once you have put all of your makeup back into your drawer in an organized way that makes sense to you, do one more overall check of what you need.  I consider myself a minimalist with makeup, so my overall checklist for my daily routine may be different from yours, but I tried to make a list for you that may encompass the basics of what you may need in your makeup drawer.

THE “BASICS” LIST


1. Concealer (lighter than your skin color)
2. Foundation (one for winter, one for summer)
3. 1 shade of blush
4. 1 bronzer
5. 3-5 shades of eyeshadow (go with natural tones, one with a little shimmer, and at least one dark color for smoky eyes)
6. 2 eyeliner pencils (at the MOST)
7. 1 mascara
8. 1 eyebrow pencil (if you use it)
9. 1 lip liner pencil (if you use it)
10. 3 tubes of lipstick (colors you will actually wear!)
11. 1 blush brush
12. 1 concealer brush
13. 1 foundation brush
14. 1 bronzer brush
15. 2 eyeshadow brushes (one that’s a little softer, and one that is tighter for a more controlled application)

Now I know this isn’t everything, but if you are working from the ground up – this is a good place to start.

REPLENISHING

Now the fun part: SHOPPING!  The most satisfying thing about cleaning out your old makeup drawer is getting shiny new replacements!  SO WORTH IT!!!!! 

Come up with a budget that works for you – but remember it’s okay to splurge because you will only do this once a year (if that).  So, whether your budget is anywhere from $50 - $250 dollars, look at your list and decide what items you really want to put your money towards. 

Your “big ticket” items to splurge on should be the things you use the most like your foundation and foundation brush, your favorite go to eyeliner, an everyday color eyeshadow, and your favorite lipstick.  EVERYONE is different so find out what works for you!  Or, you could always come in and talk to Erin, who is always willing to help you figure out a good daily makeup routine for the look you want (for free!).

Hope you feel inspired enough to get at it!  This is just an outline to get you moving, but do it however you want…the bottom line is, your are cleaning and simplifying.  At the end of the day you may feel beautiful just because you got something productive done.  After all, it wouldn’t be Spring without a little bit of SPRING CLEANING, wouldn’t it?  Tis’ the season!  Enjoy!